Page 6 of 13 FirstFirst 12345678910111213 LastLast
Results 51 to 60 of 123

Thread: M715 Hauler / Crawler Build

  1. #51

    Default

    Thanks.

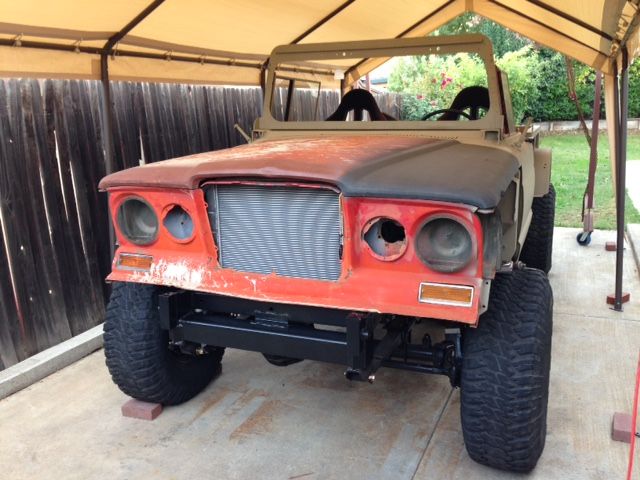
    Radiator, e-fan and shroud are in. Summit Radiator P/N: 380328

    I did the same thing many have already done, moved the passenger side radiator support over to line up with the second hole. I had to push the radiator assembly 2.5 inches forward of the original location to clear the water pump. I also had to drop it down quite a bit so the radiator cap would clear the hood.


  2. #52

    Default

    Nothing ground breaking here but I finished up the engine accessories. A rebuilt power steering pump from Borgeson along with the mounting brackets, 80 amp alternator with some modified mounting brackets and I bent up some upper radiator mount brackets. Shot some paint on the front end as well.


  3. #53
    Join Date
    Mar 2004
    Location
    northern Arizona
    Posts
    1,025

    Default

    looks good
    67 M725 67 M715 68 M715

  4. #54

    Default

    gonna pull good with that bbc

  5. #55

    Default Spark plugs and wires

    I picked up a M715 that appears to have been used as a forestry truck. Problem is they removed the stock spark plugs and wires and did a jerry rig set up with civilian plugs and wires. Is there anyone out that is converting their truck that might part with a set, that they'll not be needing any more?

  6. #56

    Default

    Whiterook,

    This question is probably better suited for the Wanted Classifieds.

  7. #57

    Default

    I was just reading through my build thread to get some inspiration to keep pushing and realized that I never offered up the Solidworks files to those of you interested. I made these models in Solidworks 2013 so shoot me a PM with the file type you’re looking for (.sldprt, .step, .X_T, .igs, .stl, .sat). The file size for the Frame only is 1.5MB.

    The obvious disclaimer:

    All the measuring was done on this one M715 in particular and does not mean that the model will represent the truck you are working on. I spent more time measuring the features that I cared about and less time on the features in between. I never actually built any parts using the model dimensions only, so measure your own truck prior to making or having parts made.


  8. #58

    Default

    I fired up the Big Block without any major issues: a few leaks (water, fuel and oil), nothing that couldn't be tightened up. So far so good, still needs some timing and carb tuning.

    I let the Kaiser stretch its legs a little. Looks like I’ll be able to run the rear shocks outboard of the frame rail. I’m using the stock fuel tank in the stock location with a little bit of surgery. The drive shaft crashes into the tank when the suspension articulates.


  9. #59

    Default

    I finished up the fuel tank mods and dropped in a new 0-90 ohm sending unit. It took a few passes with the welder to get it to seal, not very pretty but it doesn't leak. That was the most frustrating project to date. After that I hit it with the KBS Fuel Tank Sealer Kit for the belt and suspenders effect.

    With the tank in place I realized that I would not be able to remove the fwd leaf spring bolt from that side without dropping the tank, so I drilled a hole through the outside of the frame to allow the bolt to feed from that side.

    That area was starting to look like Swiss cheese…

    I’m using a Jeep J20 Power steering box with a .750 – 30 spline input. I cut the rag joint end off the stock steering shaft and welded on a Borgeson U joint.

    Painted the hood too.


  10. #60

    Default

    Not much tech here but I was double checking shock lengths and mounting positions, also measuring for brake lines.

    Made some front shock hoops. I bought the bent tube (1.5”x .120 wall DOM) from Ruff Stuff, then cut to length and notched them. I built the mounts of out some 1.5” x .219 wall DOM left over from the tie rod/ drag link project. There are two slots in the frame rail right where the shock hoops needed to tie in, so I added some 3/16” bar to cover them up.


Posting Permissions

  • You may not post new threads
  • You may not post replies
  • You may not post attachments
  • You may not edit your posts
  •  


Site Upgrade, Design Modifications & Administrative Support by:
Palm River Enterprises LLC, IT Solutions
President: Tom King, User ID=teking
This site is owned and operated by:
M715 Zone, LLC
President: Jon Schmidt, User ID=brute4c


If you have any suggestions, comments, problems or questions, contact:  brute4c@m715zone.com
Use of this site means you understand and agree to our TERMS OF USE

Copyright Notice:
This web site is subject to the protection of the copyright laws of the United States and other countries. Except for Personal Use Only, you may not modify, copy, distribute, transmit, display, perform, reproduce, publish, license, create derivative works from, transfer, or sell any information obtained from any part of the M715 Zone website without the prior written permission of M715 Zone, LLC. Written permission can only be obtained by contacting brute4c@m715zone.com

Copyright 1998-2024